PiKVM 이란?
PiKVM은 라즈베리 파이(Raspberry Pi)를 이용한 KVM-over-IP 솔루션
- KVM (Keyboard, Video, Mouse) 기능을 네트워크를 통해 원격으로 제어할 수 있도록 해줍니다.
- 서버나 PC의 BIOS 설정, OS 설치, 문제 해결 등을 물리적으로 접근하지 않고도 원격에서 수행할 수 있습니다.
- 라즈베리 파이 + HDMI 캡처 + USB 연결로 간단하게 구축 가능하며, 웹 인터페이스를 제공하여 사용이 편리합니다.
PiKVM 을 쓰려면 일단 라즈베리 파이와 영상 캡쳐를 위한 몇몇 추가 장비가 필요합니다.
성능도 꽤 좋습니다.
그런데 집에 PC가 많으니까 한 PC 에서 다른 PC를 제어하면 되지 않을까? 하면서 찾아봤습니다.
github 에 보면 옛적부터 PiKVM 을 포팅해서 x86kvm 이나 기타 등등 여러가지 있지만 원하는 형태는 잘 안보였습니다만,
최근에 OneKVM 이라고 하나 찾아서 테스트 해보니 괜찮았습니다.
OneKVM
일단 중국 친구가 PiKVM 포크해서 만든 것 같고 도커로 실행이 잘 됩니다.
VM 이미지도 제공하는데 테스트 해보니 그것도 잘 됬습니다.
영상 캡쳐는 USB-HDMI 로 사용하고, 키보드 마우스 입력은 USB-TTL 장치와 ch9329 를 이용해서 합니다.
준비물
- 도커 실행 가능 PC
- KVM 적용할 PC 또는 장치 (클라이언트)
- USB-TTL (USB UART, ch340 등 아무거나), 1,000원~4,000원
- CH9329 (UART to HID), 3,000원
- USB HDMI 캡쳐 카드 (MS2130 등), 5,000 ~ 14,000원
- 총합 9,000~20,000원
(가격은 알리익스프레스 보통 판매가이며 할인하면 더 싸게 구할 수 있습니다 )
One-KVM 설치
도커로 설치해서 사용하면 됩니다.
저는 docker-compose.yaml 만들어서 사용했습니다.
proxmox 환경에서 lxc 데비안 설치 하였으며 /dev/video0 와 /dev/ttyUSB0 를 passthrough 해서 사용했습니다.
services:
  onekvm:
    container_name: onekvm
    image: silentwind0/kvmd
    devices:
      - /dev/video0:/dev/video0
      - /dev/ttyUSB0:/dev/ttyUSB0
    network_mode: host  # 호스트 네트워크 사용, WebRTC용?
#    ports:
#      - "8080:8080"
#      - "4430:4430"
#      - "5900:5900"
#      - "623:623"
    volumes:
      - ./kvmd_config:/etc/kvmd
    environment:
      - CH9329SPEED=115200
      - USERNAME=KVM_WEB_USER
      - PASSWORD=KVM_WEB_PASSWORD
    restart: unless-stopped
접속 주소는 https://kvm-ip:4430 이며 처음 접속 시 영어로 언어 선택하면 됩니다.
USB-TTL 과 CH9329 연결
USB-TTL 과 CH9329 를 연결해주면 됩니다.
TTL CH9329
rx - tx
tx - rx
gnd - gnd
세개 선만 연결하고 vcc 는 연결하지 않습니다.
제가 가진 CH9329 와 CH340 은 생각없이 연결하고 써도 문제 없더군요.
tx 전압 측정해보니 5v 로직전압인듯 합니다.

CH9329 를 원격조종할 PC 에 연결하고, CH340 을 도커 설치할 PC 에 연결,
하드웨어가 인식 잘 되었는지 확인 후
잘 사용하면 됩니다.
CH9329 정지 문제 해결
클라이언트 PC 를 재부팅 하거나 하면 CH9329 가 자꾸 먹통이 됩니다.
CH9329 를 reset 시키면 살아납니다. (물리적으로 USB 제거 후 다시 연결, 또는 reset 신호)
x86 pikvm 에서 ch_reset.py 를 실행하면 된다고 해서 vm에 설치하고 파이썬 파일을 가져와서 조금 수정했습니다.
장치에 맞게 device path, serial 설정을 주면 됩니다.
도커 내부에 들어가서
python3 ./ch_reset.py
실행해주면 CH9329 가 리셋되면서 다시 사용 가능합니다.
(host 에서 해도 되나 파이썬 라이브러리 설치가 귀찮습니다..)
해당 파일은 kvmd_config 에 고이 넣어둡니다. 아래에서 쓰기 쉽게 만들거거든요.
kvmd_config/ch_reset.py
#!/usr/bin/python3
import serial
import time

device_path = "/dev/ttyUSB0"
chip = serial.Serial(device_path, 115200, timeout=1)

command = [87, 171, 0, 15, 0]
sum = sum(command) % 256
command.append(sum)

print("Resetting CH9329")

chip.write(serial.to_bytes(command))

time.sleep(0.2)

data = list(chip.read(5))
print("Initial data:", data)

if data[4] :
        more_data = list(chip.read(data[4]))
        data.extend(more_data)
print("Output: ", data)

chip.close()
실행하기 쉽게 쉘스크립트로 하나 만들어줍니다.
kvmd_config/ch_reset.sh
#!/bin/bash
/usr/local/bin/python3 /etc/kvmd/ch_reset.py
저장 후 실행 가능하게 권한 설정 해주고요
chmod +x ch_reset.sh
CH9329 추가 설정
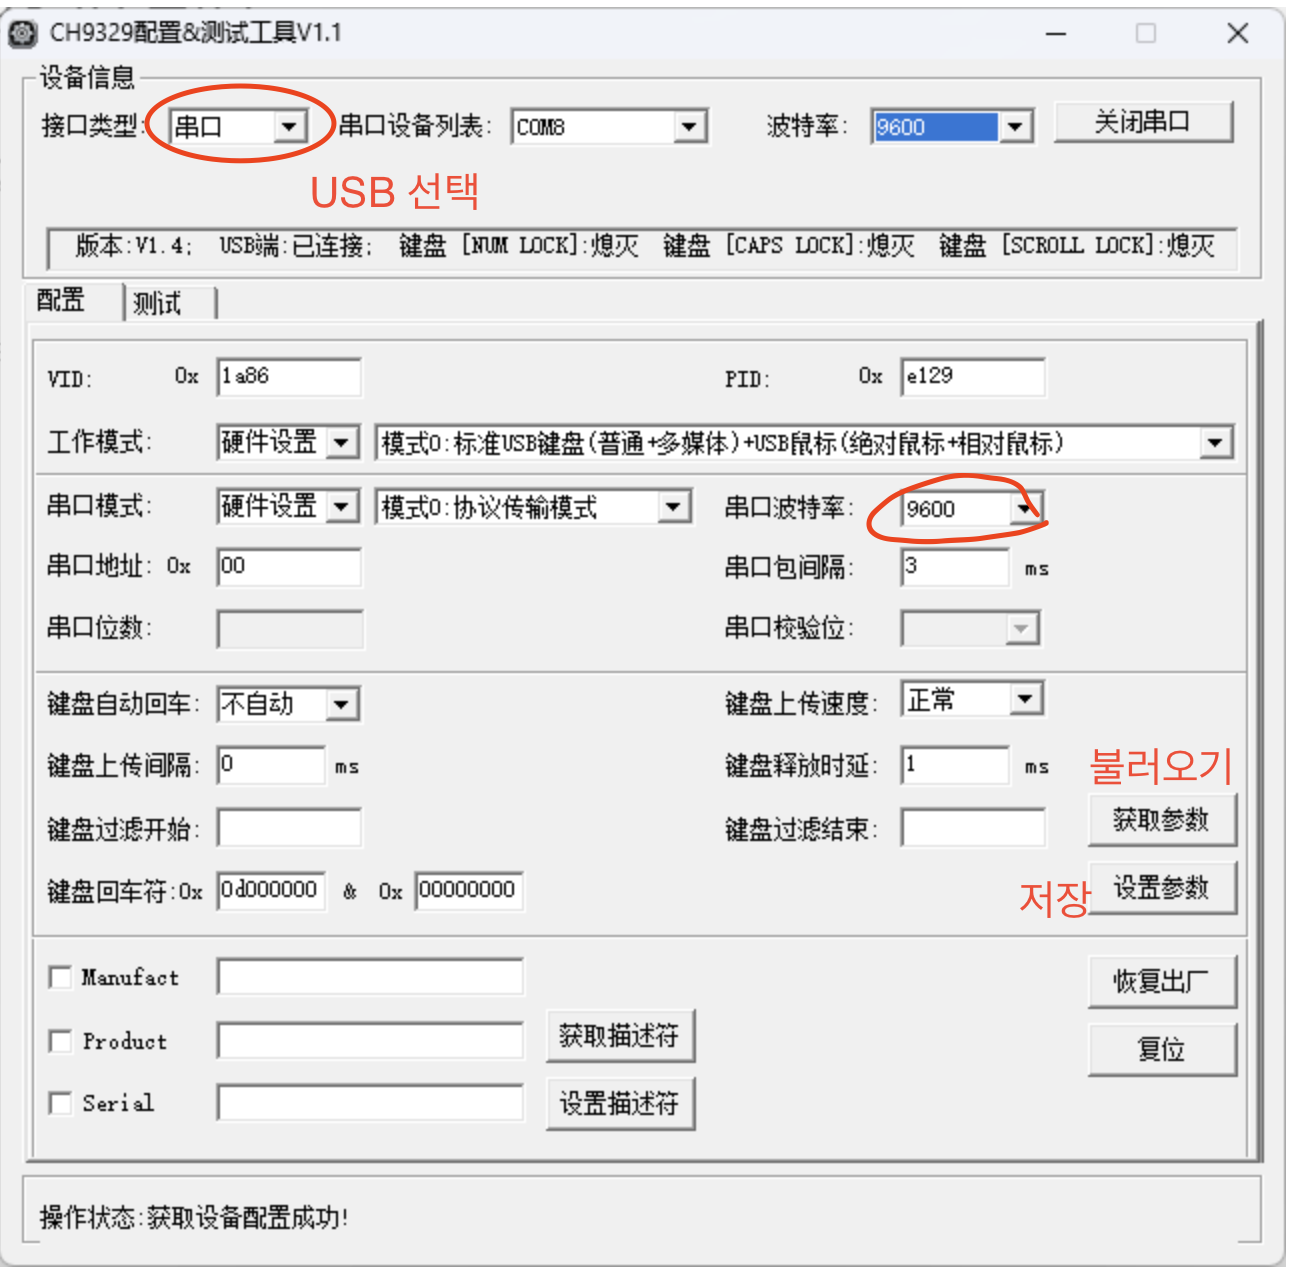
CH9329 통신 속도가 기본값은 9600 인데 115200 으로 바꾸면 조금 더 안정적이라고 합니다.
도커 환경변수에 넣어서 반영 시켰지만 장치 기본값도 바꿔놓으면 좀 더 안정정입니다.
아래 링크에서 프로그램을 받아서 CH9329만 USB 에 꽃은 후 실행합니다. (윈도우 PC)
https://www.wch.cn/downloads/CH9329EVT_ZIP.html
메뉴가 다 깨지는데 대충 추측해서 눌러봅니다.
왼쪽 위에서 USB 로 연결되었다고 선택 한 후 연결 시키면 아래 정보가 뜹니다.
오른쪽 버튼 눌러서 불러오고 통신 속도를 115200 으로 바꾸고 다시 저장하면 됩니다.
KVM 에서 mouse jiggler 를 켜놓으면 계속 통신되니 안정적이라는 내용도 있네요.
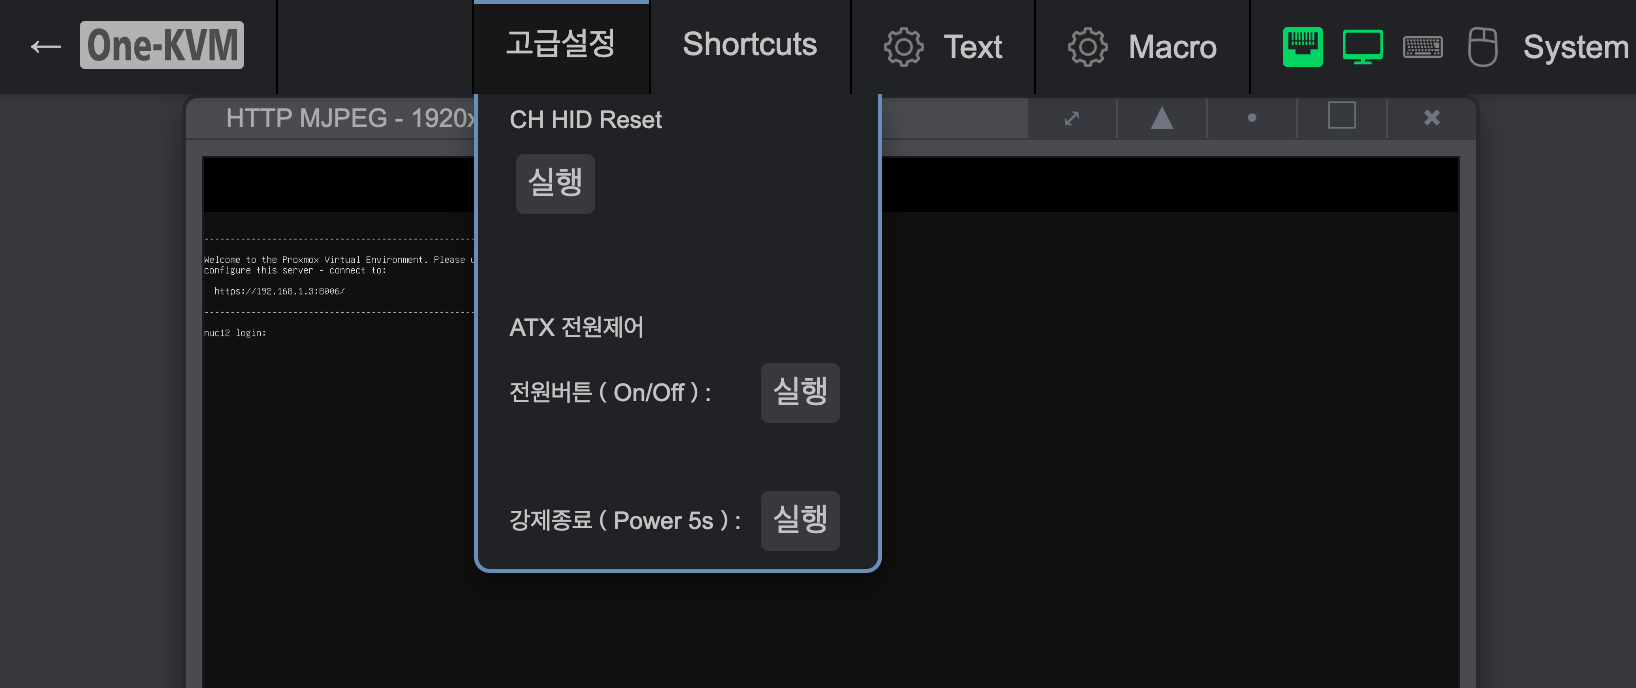
KVM 메뉴 커스텀
KVM 접속 시 상단에 불필요한 중국어로 된 메뉴가 있어서 커스텀을 조금 했습니다.
위에서 만든 CH HID Reset 을 추가해주고 개인적으로 쓰는 ATX 전원제어 장치(Rest API 동작) 명령어를 넣어줬습니다.
아래 파일을 편집하면 됩니다. 필요한 부분만 수정했습니다. 안쓰는 내용도 좀 있어요.
수정 후 도커 재시작 하고 접속하면 이제 ch_reset 를 메뉴에서 바로 사용 할 수 있습니다.
kvmd_config/override.yaml
kvmd:
    auth:
        enabled: true

    atx:
        type: disabled

    hid:
        type: ch9329
        device: /dev/ttyUSB0
        speed: 115200
        read_timeout: 0.3

        jiggler:
            active: true
            enabled: true

        mouse_alt:
            device: /dev/kvmd-hid-mouse-alt

    msd:
        #type: otg
        remount_cmd: /bin/true
        msd_path: /var/lib/kvmd/msd
        normalfiles_path: NormalFiles
        normalfiles_size: 256

    ocr:
        langs:
            - eng
            - chi_sim

    streamer:
        resolution:
            default: 1920x1080

        forever: true

        desired_fps:
            default: 60
            max: 60

        h264_bitrate:
            default: 8000

        cmd:
            - "/usr/bin/ustreamer"
            - "--device=/dev/video0"
            - "--persistent"
            - "--format=mjpeg"
            - "--encoder=LIBX264-VIDEO"
            - "--resolution={resolution}"
            - "--desired-fps={desired_fps}"
            - "--drop-same-frames=30"
            - "--last-as-blank=0"
            - "--unix={unix}"
            - "--unix-rm"
            - "--unix-mode=0666"
            - "--exit-on-parent-death"
            - "--process-name-prefix={process_name_prefix}"
            - "--notify-parent"
            - "--no-log-colors"
            - "--h264-sink=kvmd::ustreamer::h264"
            - "--h264-sink-mode=0660"
            - "--jpeg-sink=kvmd::ustreamer::jpeg"
            - "--jpeg-sink-mode=0660"
            - "--h264-bitrate={h264_bitrate}"
            - "--h264-gop={h264_gop}"
            - "--h264-preset=ultrafast"
            - "--slowdown"
    gpio:
        drivers:
            ch_reset:
                type: cmd
                cmd: [/etc/kvmd/ch_reset.sh, short]
            wol_server1:
                type: wol
                mac: 2c:56:dc:db:7c:1e
            short_press:
                type: cmd
                cmd: [/etc/kvmd/power_control.sh, short]
            long_press:
                type: cmd
                cmd: [/etc/kvmd/power_control.sh, long]
            reset_press:
                type: cmd
                cmd: [/etc/kvmd/atx.sh, reset]
            input1:
                type: cmd
                cmd: [/etc/kvmd/kvm_input.sh, 1]
            input2:
                type: cmd
                cmd: [/etc/kvmd/kvm_input.sh, 2]
        scheme:
            ch_reset:
                driver: ch_reset
                pin: 0
                mode: output
                switch: false
            wol_server1:
                driver: wol_server1
                pin: 0
                mode: output
                switch: false
            short_button:
                driver: short_press
                pin: 0
                mode: output
                switch: false
            long_button:
                driver: long_press
                pin: 0
                mode: output
                switch: false
            reset_button:
                driver: reset_press
                pin: 0
                mode: output
                switch: false
            input1-button:
                driver: input1
                pin: 0
                mode: output
                switch: false
            input2-button:
                driver: input2
                pin: 0
                mode: output
                switch: false
        view:
            header:
                title: 고급설정
            table:
                - ["#CH HID Reset"]
                - ["ch9329 reset :", ch_reset|실행]
                - ["----------------"]
                - [" "]
                - [" "]
                - [" "]
                - [" "]
                - [" "]
                - ["#ATX 전원제어"]
                - ["#전원버튼(On/Off):", short_button|실행]
                - [" "]
                - [" "]
                - [" "]
                - ["#강제종료(Power 5s):", long_button|실행]


vnc:
    keymap: /usr/share/kvmd/keymaps/en-us
    mouse_output: usb

    auth:
        vncauth:
            enabled: true

    memsink:
        jpeg:
            sink: "kvmd::ustreamer::jpeg"
        h264:
            sink: "kvmd::ustreamer::h264"

media:
    memsink:
        h264:
            sink: 'kvmd::ustreamer::h264'

        jpeg:
            sink: 'kvmd::ustreamer::jpeg'
janus:
    stun:
        host: stun.cloudflare.com
        port: 3478

otgnet:
    commands:
        post_start_cmd:
            - "/bin/true"
        pre_stop_cmd:
            - "/bin/true"

nginx:
    http:
        port: 8080
    https:
        port: 4430
여기까지 커스텀 완료했습니다.
도커는 영상모드는 mjpeg 만 사용되는데 내부망에서는 빠르고 좋습니다.
HW 패스스루/드라이버/캡쳐USB 문제인 것 같아서 몇번 해보고 포기했습니다.
VM 으로 깔면 WebRTC도 되긴 하는데 별로 좋은지 모르겠습니다.
저는 추가로 power_control.sh 에서 전원 버튼 누를때마다 ch_reset.py 실행하는 로직까지 넣어놨습니다.
바이오스 들어가기 한결 편하더라구요.
'서버와 홈디바이스 > NAS, VPN, 클라우드' 카테고리의 다른 글
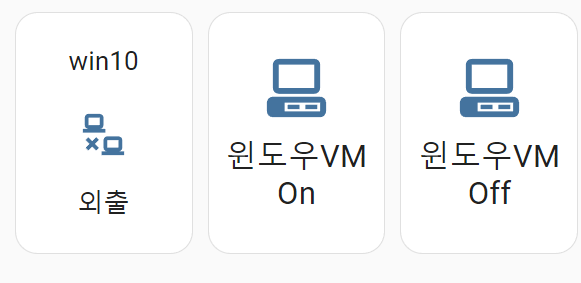
| HA에 Proxmox VM 온오프 버튼 만들기 (0) | 2023.03.22 |
|---|---|
| Proxmox UPS 설정 가이드 (1) | 2023.03.22 |
| 시놀로지 duckdns dns 인증서 설정 - acme (0) | 2023.03.22 |
| Proxmox 7.0 컨테이너에서 plex hw 트랜스코딩 사용 (0) | 2021.08.16 |
| Android ADB 연결 후 vi / nano 에디터 사용 (0) | 2020.08.13 |